
1.) The first step, for me, is always one of the most enjoyable. It's when I come up with the concept for my design. This piece is going to be a beaded cuff bracelet. I like to use graph paper to mark my design and lay out the beads in different formations. Sometimes I take pictures of different patterns and then refer back to them to choose my favorite. This time around I chose a gorgeous pillow square labradorite cabochon as my focal and some gorgeous stones in aqua and olive green.

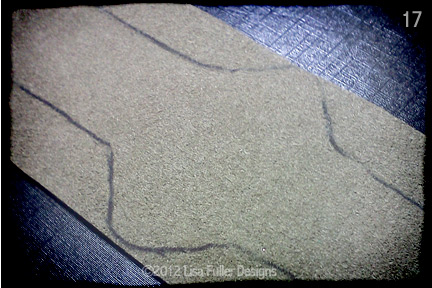
2.) Cuff bracelets can be either free form where they are pliable/flexible in their final wearable state or they have a metal blank inside them so they hold their shape. I've done both and enjoy the process of both. This time around I chose to do the metal blank. First I measured the cuff and then drew my dimensions out on my base fabric, a stiff black felt.

3.) I mark my center point and then each inch along the length just to keep some sense of symmetry as I go. ;)

4.) Here's a closeup of the labradorite cab. The flash is absolutely stunning!

5. & 6.) Unlike a bead, a cabochon has no hole in it. It can't be sewn on so it has to be attached to the project. I use a needle to spread some E6000 glue on the back of my cab and then press it firmly in place. This allows it to hold on its own before I bezel it with beads.


7.) Here's an array of possible beads to use within my chosen color palette. I won't use all of them, but it's nice to see everything laid out side by side. I LOVE these ceramic artist palette's. The white background makes the colors pop!

8. & 9.) Shot 8 is the very first step of creating the bezel around the center stone. Depending on the thickness of the stone it will determine how many times I have to go around, basically stacking the beads and building rows until the cab is enclosed on all sides, securing it to the cuff. The second shot is what the cab looks like after the beads curve up around the sides.


10.) Now we're getting down to business. After the center cab is attached I can just go to town, attaching the larger surrounding stones first and then beading around them with seed beads.

11. & 12.) These shots shows masking tape in place. I like to use this technique sometimes when I am going for a really straight edge. It helps when cuffs are going to have the metal blank inside to ensure a generally consistent width throughout. I've also found that having the tape wrapped around the edges allows for a nice grip on my piece as I work.


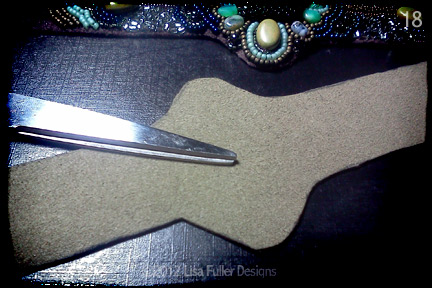
13.) This is the piece when the majority of the beading has been completed and it's been cut out. At this point, I like to leave some length on the ends just to give some wiggle room for when the beadwork is being attached to the metal blank. It's coming along nicely, don't you think? I was going for an art deco style and I think I captured it. :)

14.) Now I'm ready to choose my backing fabric. People use all kinds of things: leather, denim, recycled fabric, suede, etc. I like to use ultra-suede. It comes in a gorgeous array of colors, is fairly inexpensive and feels smooth and velvety when being worn against the skin. It can look very cool to line your cuff with a contrasting color (a'la Louboutin). I wanted something coordinating this time. I had several options to choose from as you see the colors beneath the beadwork.

15.) My two favorites were the vibrant turquoise and this olivey-taupey green. Though I love the way the turquoise pops, I'm going for something a little more subtle this time around so I went with the olive.


20.) Now it's time to start putting all the pieces together. I know many books and people who say to use glue to attach but I've found that a heavy-duty double stick tape does an amazing job. It holds the piece in place and doesn't have that stinky glue smell. Also, it doesn't bleed through your fabric, only to leave you with a goopy mess on a piece you've spent hours creating. (GRRR!)

21.) First I lay a piece of double-stick tape along the inner side of my cuff....


24.) Next I lay a strip of double-stick tape along the top side of the metal blank. Starting in the center, I lay my beadwork down and press it firmly against the cuff to adhere it.

25.) Extra strips can be added to make sure each end is held in place. Shot 25 allows you to see how everything is all sandwiched together before the final end of beadwork is stuck down.


So, there you have it. The whole beady process. Was it what you thought it would be? Easier? More complicated? I'm curious to hear what people think. I know it's a common opinion in the art world that people don't understand the work that can go into a piece. The planning, the construction, the hours spent perfecting that vision born first in your mind. I've had people think I was nuts when I told them pricing on pieces before but I hope something like this will help to explain why handmade beadwork isn't cheap. We do what we do because we love it, not because we want to sell to the claire's fans of the world. Handmade beadwork is an artform and I'm glad to have the opportunity to share my love it with you all.
Thanks for reading!
Lisa
Love the cuff you made. But also the explanation of why it is so expensive. I have the same problem with folk when they see the price of my pieces. They think I sit around and just put beads on while watching TV. And some of the beads are not that inexpensive. You do beautiful work. I look forward to seeing more. Kathie
ReplyDeleteThank you, Kathie! I think it's important that people realize handcrafted jewelry is not all the same and that there can be quite a bit of time that goes into something, especially a one of a kind piece. Thanks so much for your kind words!
DeleteYou are so awesome. :)
ReplyDeleteThanks, sweetie. :) <3
DeleteWhat a great tutorial - thanks for posting it!
ReplyDeleteYou're welcome, Lindsey. And thank YOU!
DeleteThank you so much for this tutorial. I really wanted to have a go at doing bead embroidery and didn't know where to start. Now I do and can't wait to start. Watch out bead shops here I come :D
ReplyDeleteHi Suzie! So glad it inspired you to give it a shot. I wanted to share the process so people would understand the nature of the beast. Thank you for your kind comments!! Be kind to those bead shops! ;>
DeleteLisa, the beautiful bracelet! Thank you for the tutorial.
ReplyDeleteThanks so much. I'm glad the tutorial was helpful. Happy beading!!
DeleteLisa
Lisa, I've tried to contact you through Little Pie Studio, but the link is not working for me. I am the administrator of a large Facebook Beading group. I would like to use one or two photos from this post and provide a link to your tutorial in an upcoming Challenge. Please contact me at
ReplyDeletefbseedbeadsandmore "at" gmail.com....Thanks!
Dear Lisa,
ReplyDeletethank you so much for this great tutorial! Bead embroidery will be my next project, now with your kind help!
Much love,
Ildiko
Thank you very much, Ildiko. I appreciate the fact that I can encourage someone else to give the process a try thru my tutorial. Enjoy your journey!
DeleteLisa
Hi Lisa, I do bead embroidery also, and sell my cuffs on Etsy. It never occurred to me to bend the cuff blanks. Great! I feel so dense.
ReplyDeleteYour work is beautiful.
Hello Deci,
DeleteI apologize for the lateness of the reply. This blog is inactive and I never got the notification that you'd left a comment. I appreciate your kindness and wish you luck with your etsy sales!!
Lisa
This was GREAT!!! I just bought 5 cool vintage Dark and Swarthy (Bisbee-like) Turquoise cabochons from an estate, and I'm gonna make a cooler than cool cuff beaded bracelet similiar to this, perhaps a little more masculine...maybe a snakeskin design. I can't wait!! This kinda gave me the idea of the materials I would need and also the process in a nutshelll without looking for a book or something....Thank you! I will be checking out your store for lagnappes...thank yhou!
ReplyDeleteHello SirBrackalot,
DeleteI apologize for the lateness of the reply. This blog is inactive and I never got the notification that you'd left a comment. Thank you for the kind words. I'm glad my work inspired you and hope you enjoyed the process of creating your cooler than cool cuff!! :)
Lisa
Can I just ask is the process exactly the same when your not adding the metal blank.
ReplyDeleteHello Lyndsey,
DeleteYes, you would complete it the same way up to the point of stitching the beaded front to the backing material, just without sandwiching the cuff between them. Depending on the type of clasp/closure you decide, you may need to attach it prior to closing up the edge of the bracelet. Happy beading!!
Can I just ask is the process exactly the same when your not adding the metal blank.
ReplyDelete